Hunting Dangling DNS: How to Exploit AWS Elastic IPs, CloudFront, and S3
Modern cloud environments are built for speed: infrastructure spins up in minutes, scales automatically, and gets torn down just as quickly. DNS, however, rarely moves at the same pace. When a service is deleted but the DNS record pointing to it remains, that leftover mapping becomes a dangling record, and dangling records can become an open door to full subdomain takeover.
For bug bounty hunters and penetration testers, this isn’t a theoretical concern. In real programs, dangling Elastic IPs, abandoned CloudFront configurations, and deleted S3 origins have repeatedly turned “harmless” DNS hygiene mistakes into high-impact vulnerabilities.
This article breaks down three practical takeover paths in AWS-centric environments, dangling Elastic IPs, CloudFront distribution takeovers, and the increasingly common “CloudFront-to-dead-S3-origin” pivot, then closes with safe proof-of-concept practices and concrete defensive remediation.
What Are Dangling DNS Records in Cloud Security?
Cloud infrastructure is often managed by CI/CD pipelines, Terraform state, and platform automation. DNS records, on the other hand, might be managed in:
- a separate repository or Terraform workspace
- Route53 entries edited manually during incidents
- legacy “temporary” records nobody remembers to remove
- external DNS providers not tied into the same automation flow
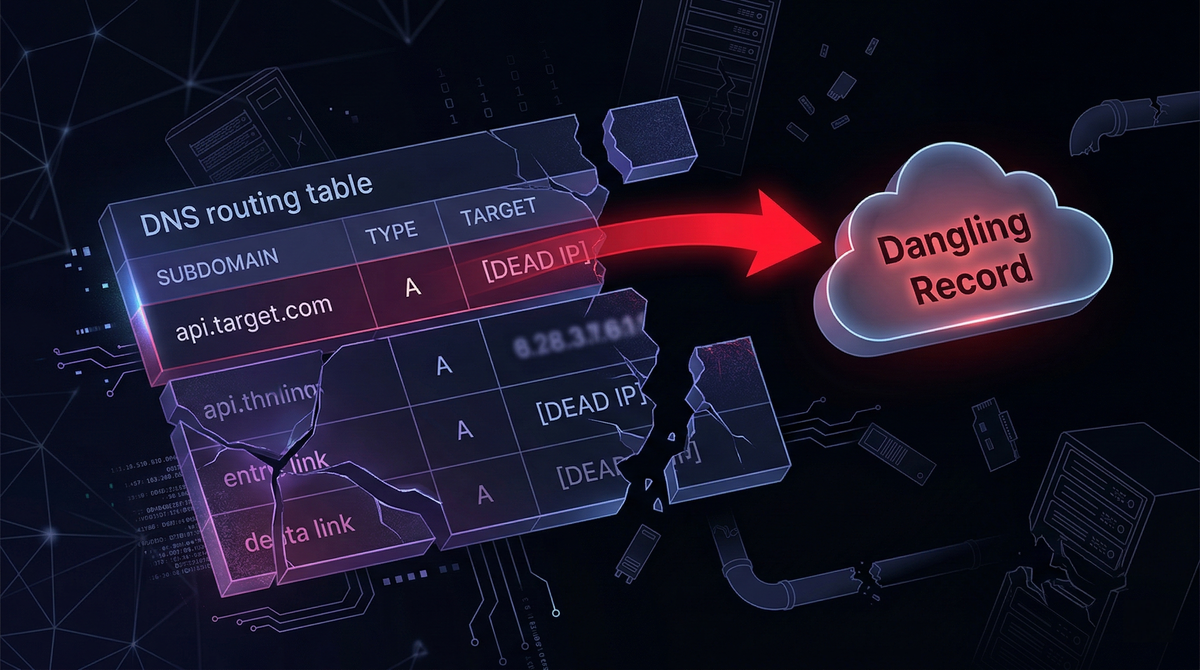
A record is “dangling” when it still resolves, but the underlying resource it points to no longer exists or is no longer controlled by the organization.
The attacker’s opportunity comes from a simple reality: if the target no longer owns the thing DNS points to, the attacker might be able to.
AWS EC2 Subdomain Takeovers: Exploiting Dangling Elastic IPs
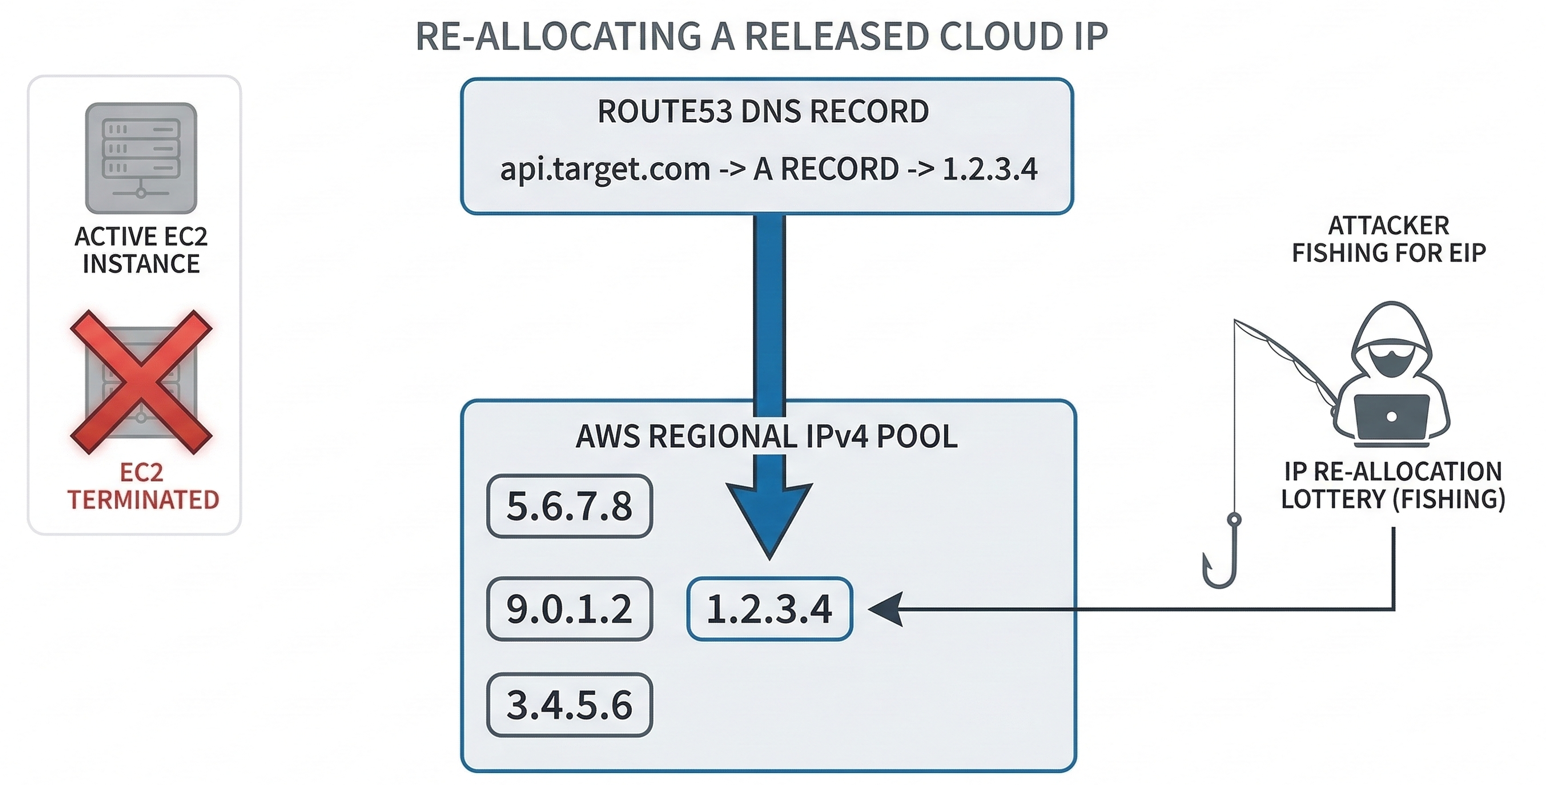
This is an infrastructure-level takeover based on the way AWS public IPv4 addresses can be released and later reallocated from an AWS regional pool. The technique commonly associated with this is “IP Pool Fishing.”
Many organizations attach an Elastic IP (EIP) to an EC2 instance to keep a stable public address. Then they create a DNS A record like:
api.target.com→X.X.X.X(the Elastic IP)
If the organization later terminates the EC2 instance and releases the EIP (often to reduce cost), the IP returns to AWS’s available pool. If they forget to delete the DNS record, the subdomain still points to that same IP address, except now it may be available for someone else to claim.
Step-by-Step Attack Workflow: AWS IP Pool Fishing
1) Reconnaissance and enumeration
The attacker starts by enumerating subdomains and resolving them:
- Enumerate:
subfinder,amass - Resolve:
dnsx(or similar) - Identify AWS-owned IPs by comparing results to AWS ranges (from AWS
ip-ranges.json)
The goal here is to isolate subdomains whose A records point into AWS space.
2) Identify likely dangling IP candidates
Next, the attacker probes the resolved IPs. An IP that times out or appears completely unresponsive over common ports (HTTP/HTTPS) can be a candidate for being “released.”
This is not definitive by itself, firewalls and network ACLs can also cause silence, but it’s a strong signal in context, especially when combined with historical DNS clues.
3) Regional scoping (critical detail)
AWS IP pools are regional. If you attempt to “fish” in the wrong region, you can loop forever and never reallocate the right IP.
Attackers infer region using:
- historical DNS data
- passive DNS sources
- mapping IP ranges back to region blocks where possible
4) The allocation lottery
Once the region is known, the attacker repeatedly allocates and releases EIPs in that region until they receive the exact target IP.
Conceptually:
- allocate an EIP
- check “did I get the dangling IP?”
- if not, release immediately
- repeat until success
5) Bind the IP to attacker-controlled infrastructure
When the attacker finally receives the exact IP, they attach it to their own EC2 instance. At that moment:
api.target.comnow resolves to the attacker’s server
That is subdomain takeover in its purest form: DNS routing now terminates on attacker infrastructure.
This methodology has been proven in the field. A well-known example involved a dangling A record on an internet.org (Facebook) subdomain, where the researcher successfully reallocated the released IP in the correct region and demonstrated control, earning a bounty and confirming the viability of IP pool fishing at enterprise scale.
Limitations and constraints
Attack Limitations: Rate Limits and Probability
AWS has a huge IPv4 pool. Even scoped to a region, the probability can be low. This can mean long runtimes, many API calls, and real cost.
Rate limiting and account risk
AWS throttles aggressive allocation/release loops. If you spam the API without pacing, you can trigger:
- throttling that slows the attack drastically
- temporary restrictions
- potential account review or suspension
A practical attacker (or researcher) has to manage delays and error handling carefully.
AWS CloudFront Subdomain Takeovers via Abandoned CNAMEs
CloudFront takeovers usually happen via CNAME routing rather than raw IP addresses. Historically, this class of takeover was straightforward; modern AWS mitigations have added friction, but the workflow is still important to understand, especially for detection and triage.
A typical setup looks like:
- CloudFront distribution hostname:
d111111abcdef8.cloudfront.net - Branded subdomain:
cdn.target.com - DNS record:
cdn.target.com→ CNAME →d111111abcdef8.cloudfront.net
If the distribution is deleted but the CNAME remains, the subdomain becomes dangling.
Attack workflow
1) Recon: Find CloudFront CNAMEs
Enumerate subdomains and inspect DNS records. Anything with:
- CNAME to
.cloudfront.net
is a candidate worth investigating.
2) Verify via browser or HTTP client
A deleted or misconfigured distribution often returns recognizable errors such as:
HTTP 403 ERROR - The request could not be satisfiedBad Request
While these errors aren’t always exclusive to takeovers, they’re valuable fingerprints.
3) Exploit (classic method)
The classic takeover method was:
- create a CloudFront distribution in attacker’s AWS account
- add the victim subdomain (e.g.,
cdn.target.com) as an Alternate Domain Name - CloudFront routing uses the Host header to map traffic to the attacker distribution
AWS introduced Domain Ownership Validation to reduce exactly this abuse. Today, you generally cannot just claim arbitrary alternate domains. You must prove control by attaching an ACM certificate that requires DNS or email validation.
This mitigation has reduced the “direct” CloudFront claim path. But it has not eliminated the risk of dangling records, especially when attackers pivot to the origin behind CloudFront.
S3 Bucket Origin Takeovers: Bypassing CloudFront Protections
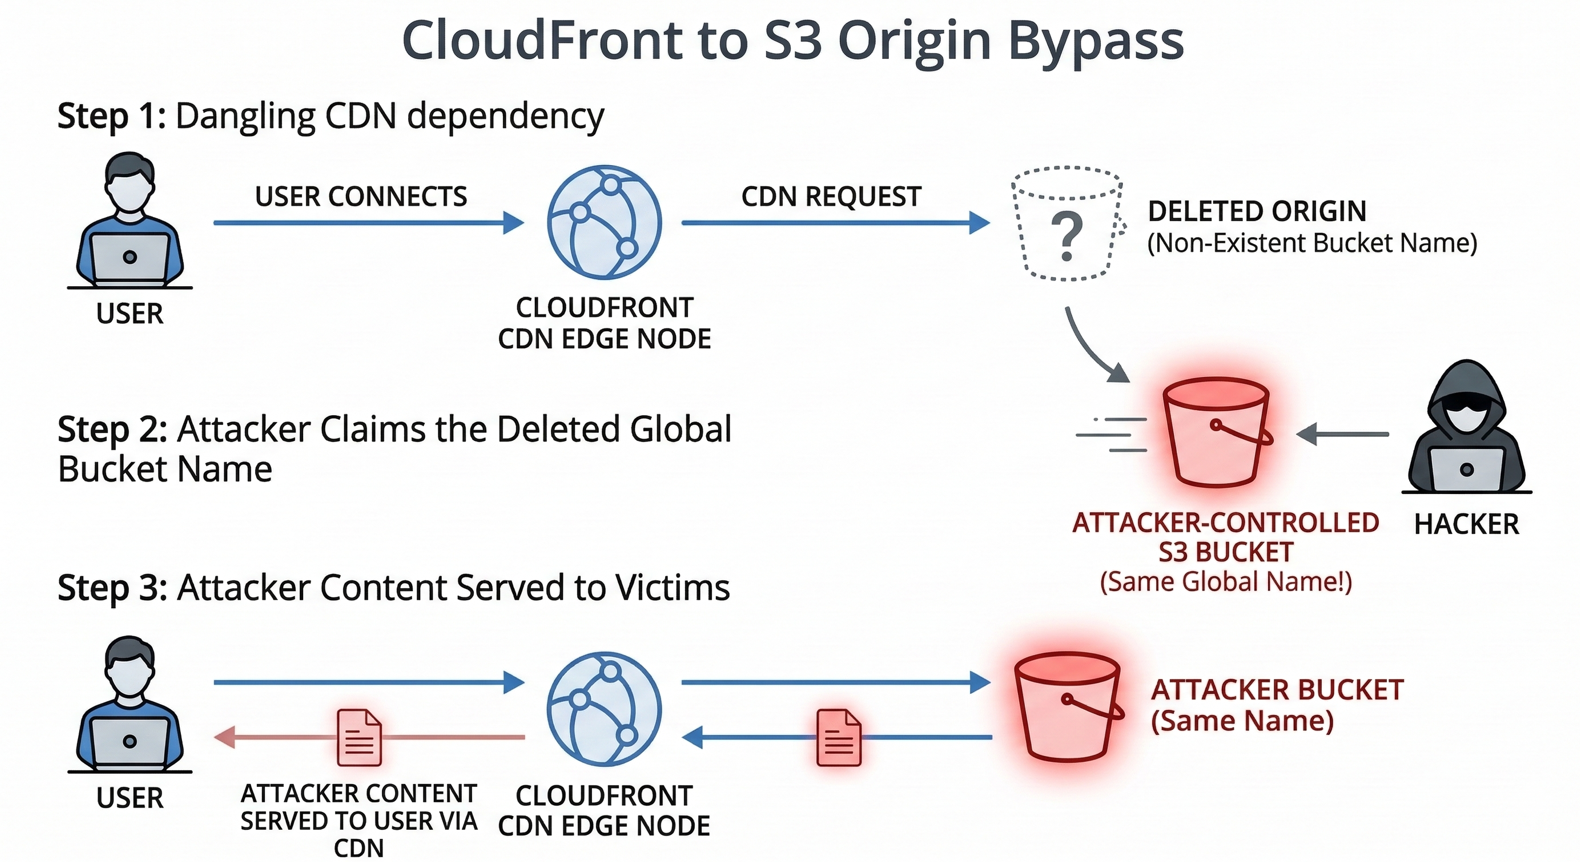
As CloudFront direct takeovers became harder, a more practical pattern emerged in real assessments: the CloudFront distribution still exists, but the origin it points to has been deleted, often an S3 bucket destroyed by automation.
This creates a different kind of dangling dependency: CloudFront continues to serve a domain, but fetches content from an origin name that may be re-registrable.
Understanding CloudFront and S3 Origin Dependencies
CloudFront needs an origin to pull content from. Commonly:
- an S3 bucket acts as the origin
If the S3 bucket is deleted but the distribution remains active, CloudFront keeps trying to fetch from that bucket name.
How to Hijack a Deleted S3 Origin Bucket1) Recon: Look for S3-origin failure signatures
When the origin bucket is missing, CloudFront may pass through an S3 XML error like:
<Code>NoSuchBucket</Code>
This is a strong confirmation signal: the distribution exists, the routing works, but the backend bucket is gone.
2) Identify the exact bucket name
To exploit, the attacker must know the precise bucket name CloudFront is trying to reach.
This can be discovered through:
- naming conventions (bucket name equals subdomain, project, or environment)
- leaked details in response headers
- OSINT, code, documentation, or JS bundles that reference the origin
3) Recreate the bucket in attacker’s account
S3 bucket names are globally unique. When a bucket is deleted, its name may become available again.
If the attacker can create a bucket with the exact name:
- they now control the origin identity CloudFront expects
4) Host a benign payload (or attacker content)
The attacker uploads a file and configures access as needed (often public-read, depending on the origin setup).
5) Takeover outcome: CloudFront serves attacker-controlled content
Now, when users visit the victim subdomain, CloudFront fetches from the “same” origin name, which the attacker owns, and serves the attacker’s content to end users.
Why S3 Origin Takeovers are Critical Vulnerabilities
This path is especially important because it can sidestep the CloudFront alternate domain validation hurdle. The attacker isn’t claiming the CloudFront distribution. They’re claiming what the distribution depends on.
That makes it a realistic risk in environments where:
- CloudFront is long-lived
- S3 buckets are ephemeral (dev/staging teardown, branch preview environments)
- DNS and distribution configs aren’t audited continuously
Bug Bounty Best Practices: Crafting Safe Proof of Concepts (PoC)
Subdomain takeover testing can easily cross the line from “proof” into “harm.” Even if you have permission to test, you typically do not have permission to intercept real user traffic or deface a production experience.
A professional PoC should demonstrate control while minimizing impact.
Safer proof strategies
Serve a hidden proof file
Instead of changing an index page, host something like:
/bugbounty-poc.txt
Include your handle, timestamp, and a short statement indicating proof-of-control for the report.
This reduces the chance of alarming users or disrupting a production workflow.
Use benign HTML if an index page is necessary
If the program requires a visible proof, keep it neutral:
- “This subdomain is currently undergoing security maintenance.”
Avoid anything that looks like a defacement or implies a breach.
Document everything
Especially for Elastic IP fishing, maintain records such as:
- allocation attempts and timestamps
- region selection logic
- logs proving when the IP was acquired
This makes triage faster and reduces disputes about reproducibility.
Defense and Remediation: How to Prevent Dangling DNS Attacks
The most important defensive principle is simple: DNS must be treated as part of infrastructure lifecycle, not an afterthought.
Practical Steps for Automated DNS Auditing
Automate audits, don’t rely on humans
Manual cleanup fails under real operational load. Teams need automated checks that continuously validate whether DNS targets still exist and are still owned.
Cross-reference DNS against live cloud assets
For AWS environments, effective auditing means comparing DNS records against:
- active Elastic IP allocations
- existing CloudFront distributions
- existing S3 buckets (and expected origin names)
If DNS points to something absent or unowned, it should be flagged immediately.
Industry-standard tooling
A known defensive approach is using automated enumeration and validation tools like Ghostbuster (Assetnote), which systematically checks Route53 records and correlates them with actual AWS resources to detect dangling pointers early, before an attacker gets the chance to fish an IP or reclaim a bucket name.
Automating Subdomain Discovery with Jsmon Reconnaissance
Subdomain takeovers don’t start with takeover, they start with discovery. The hardest part is often finding the forgotten subdomain in the first place.
While Jsmon is widely used for monitoring JavaScript bundles and extracting hidden API endpoints, it also provides a powerful edge for takeover hunting because modern frontends frequently contain:
- legacy hostnames
- staging URLs
- old CDN references
- environment-specific subdomains
Integrating Jsmon into Your Bug Bounty Workflow
1) Extract hostnames from real production JS
Jsmon monitors JS assets and pulls out URLs/hostnames such as:
https://assets-v1-legacy.target.com
These are exactly the kinds of “forgotten but still referenced” domains that lead to dangling infrastructure.
2) Pipe hostnames into DNS resolution
Once extracted, hostnames can be resolved and validated at scale using:
dnsxMassDNS
3) Prioritize error signatures and dead infrastructure
If a discovered subdomain:
- fails to resolve
- returns CloudFront-like errors
- returns
NoSuchBucketsignatures - points to unresponsive AWS IPs
…it becomes a high-probability takeover candidate worth deeper validation.
Conclusion: Securing Modern Cloud DNS Infrastructure
Subdomain takeover has matured. It’s no longer just about abandoned third-party SaaS apps, it’s about the gaps created when fast-moving infrastructure outpaces slow-moving DNS and configuration hygiene.
- Dangling Elastic IPs turn into a game of regional allocation probability.
- CloudFront takeovers evolved as AWS added domain ownership validation.
- S3-origin takeovers remain a practical bypass when CDNs outlive their backend buckets.
For security researchers, the lesson is that subtle routing behavior, timeouts, XML errors, and CNAME fingerprints, can hide critical impact. For defenders, the message is even clearer: DNS management must be automated, continuously audited, and tightly coupled to the infrastructure it represents.
References and Further Reading
- Assetnote Research: Eliminating Dangling Elastic IP Takeovers with Ghostbuster (Shubham Shah)
- Bishop Fox: Fishing the AWS IP Pool for Dangling Domains
- 0xpatrik: Subdomain Takeover: Proof Creation for Bug Bounties
- Amal Murali: Dangling DNS Records on Internet.org (write-up)
- EdOverflow: Can I Take Over XYZ? (error signatures and service-specific guidance)