Automating JavaScript Reconnaissance: A Complete Guide to Jsmon CLI

If you've been hunting bugs or conducting security assessments for a while, you've probably experienced the frustration of manually analyzing JavaScript files across dozens, or even hundreds, of subdomains. While browser-based tools and Burp Suite extensions are excellent for deep-dive analysis of individual targets, they simply don't scale when you're dealing with large attack surfaces.
This is where automation becomes not just convenient, but essential. You can't manually click through 500 subdomains, inspect each JavaScript file, and extract sensitive data without burning through hours or even days of valuable time. Bug bounty hunters and red team operators need speed, scalability, and the ability to integrate reconnaissance seamlessly into their existing workflows.
Enter Jsmon CLI, a command-line interface that brings the full power of the Jsmon cloud engine directly to your terminal. With Jsmon CLI, you can scan thousands of assets in minutes, chain it with your favorite enumeration tools like subfinder or httpx, and query results instantly without touching a graphical interface. It's reconnaissance at scale, automated and efficient.
Installation & Setup
Before diving into the capabilities of Jsmon CLI, you'll need to get it up and running on your system. The installation process is straightforward, but there are a few prerequisites to keep in mind.
Prerequisites
Jsmon CLI is built using Go (Golang), which means you'll need to have Go installed on your machine. If you haven't already installed Go, head over to the official Go website and download the latest stable version for your operating system. Once Go is properly configured with your GOPATH set up, you're ready to proceed.
Installing Jsmon CLI
The installation process couldn't be simpler. Open your terminal and run the following one-liner:
go install github.com/jsmonhq/jsmon-cli@latestThis command will fetch the latest version of Jsmon CLI from GitHub and install it directly into your Go binaries directory. Depending on your internet connection and system performance, this should complete in just a few seconds.
Verifying the Installation
Once the installation completes, it's always a good practice to verify that everything is working correctly. You can do this by running the help command:
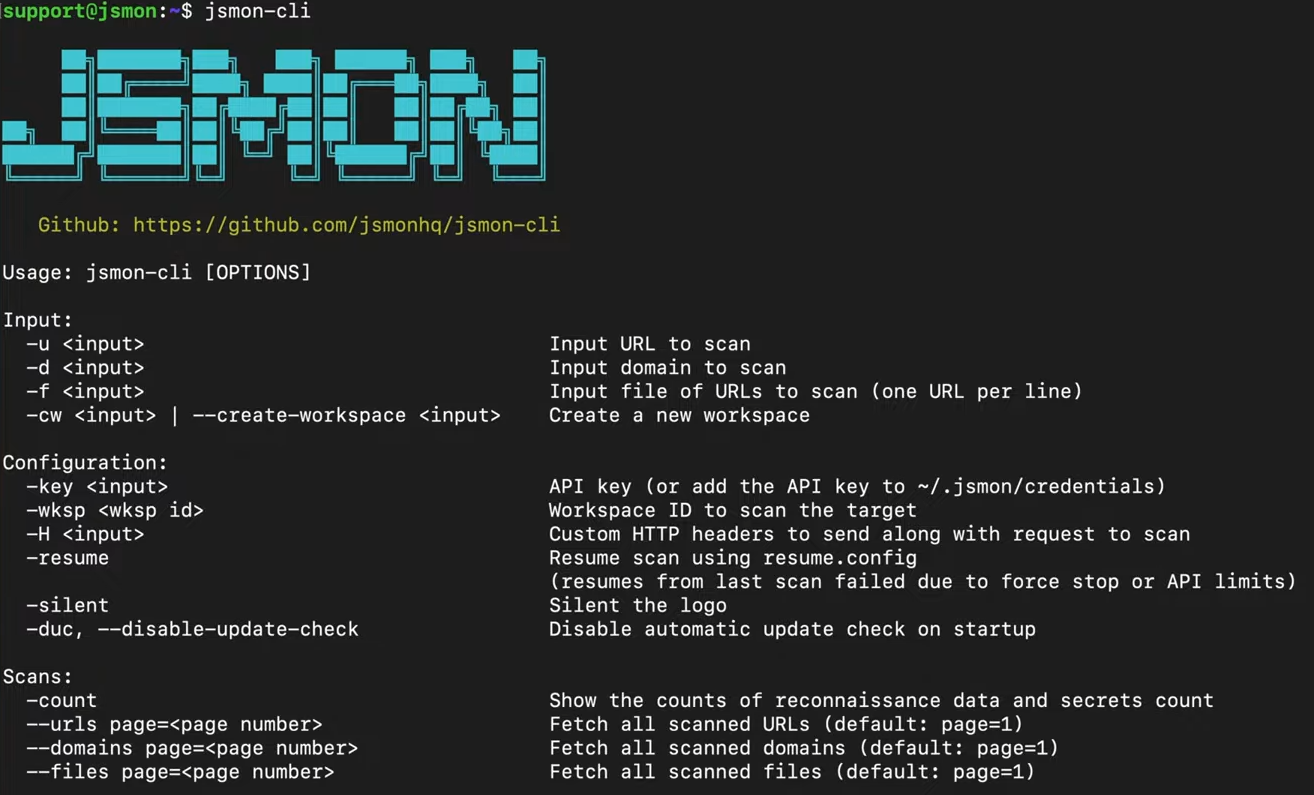
jsmon-cli --help
If the installation was successful, you should see the Jsmon CLI ASCII banner followed by a comprehensive help menu listing all available commands and flags. This output confirms that the tool is properly installed and ready to use.
Configuration: API Keys & Workspaces
Now that Jsmon CLI is installed, the next critical step is configuration. Unlike standalone tools that operate entirely locally, Jsmon CLI communicates with the Jsmon cloud engine to perform its analysis. This architecture offers significant advantages, you get access to a powerful backend that processes JavaScript files, extracts intelligence, and stores results in an organized manner.
Understanding the Architecture
The Jsmon cloud engine does the heavy lifting when it comes to parsing JavaScript files, extracting endpoints, identifying secrets, and cataloging findings. Your CLI tool acts as a client that sends targets to the cloud, then queries the results. To use this system, you need to authenticate using an API key.
Obtaining Your API Key
Getting your API key is a simple process. Navigate to the Jsmon website at jsmon.sh and log into your account. Once logged in, go to your Profile section and look for the API Keys option. Here, you'll be able to generate a new API key if you don't already have one. Keep this key secure, it's essentially your authentication token for all CLI operations.
When running commands, you'll use the -key flag followed by your API key to authenticate your requests.
Working with Workspaces
This is where many users stumble, but it's actually one of Jsmon's most powerful organizational features. Workspaces allow you to keep reconnaissance data completely separate based on targets, projects, or campaigns. For example, you might have one workspace called "BugBounty-Target-A" and another called "RedTeam-Client-B." This separation ensures that findings don't get mixed up and makes it much easier to generate reports or review historical data.
Creating a Workspace
To create a new workspace, use the following command:
jsmon-cli -cw "BugBounty-Target-1" -key <YOUR_API_KEY>
Replace <YOUR_API_KEY> with your actual API key, and choose a descriptive name for your workspace. The tool will communicate with the Jsmon cloud and create the workspace for you.
Listing Your Workspaces
Once you've created one or more workspaces, you'll need their unique IDs to use them in subsequent commands. To retrieve a list of all your workspaces along with their IDs, run:
jsmon-cli -workspaces -key <YOUR_API_KEY>
This will display all your workspaces with their corresponding IDs. Make note of the ID for the workspace you want to use, you'll need it for every scan and query operation.
The First Scan: Data Collection
With your API key and workspace ID in hand, you're now ready to perform your first scan. This is where Jsmon CLI truly begins to shine, you can scan individual domains, or scale up to scan hundreds or thousands of URLs with a single command.
Scanning a Single Domain
Let's start with the basics. To scan a single domain, use the following command structure:
jsmon-cli -d target.com -key <KEY> -wksp <ID> -silent
Let me break down what each flag does:
-d [target.com](<http://target.com>)specifies the domain you want to scan-key <KEY>provides your API authentication key-wksp <ID>tells Jsmon which workspace to store the results in-silentremoves the ASCII banner and extra output for cleaner results
When you execute this command, Jsmon CLI will submit the domain to the cloud engine, which will begin crawling the target, extracting JavaScript files, and analyzing them for interesting data points. Depending on the size of the target, this process can take anywhere from a few seconds to several minutes.

Scanning Multiple Targets
Here's where the real power becomes apparent. In a typical reconnaissance workflow, you'll often have a list of live URLs, perhaps generated by tools like httpx after subdomain enumeration with subfinder. Rather than scanning each URL individually, you can feed an entire list to Jsmon CLI:
jsmon-cli -f live_urls.txt -key <KEY> -wksp <ID>
The -f flag specifies a file containing URLs (one per line). Jsmon will process each URL in the list, extract all JavaScript files, and analyze them systematically. This is where automation truly saves hours of manual work.
Extracting Intel: The Reconnaissance Modules
This is where Jsmon CLI truly differentiates itself from other tools. Once your scan is complete, all the extracted data is stored in your workspace on the Jsmon cloud. The brilliant part? You can now query this data repeatedly without having to rescan the target. This separation of the "scanning" phase from the "analysis" phase is a game-changer for efficiency.
Finding Internal Development URLs
One of the most valuable findings in JavaScript reconnaissance is discovering localhost and internal development URLs that developers accidentally left in production code. These URLs are goldmines because they reveal:
- Internal port numbers and services
- API structure and endpoints
- Backend architecture details
- Development environment configurations
To extract all localhost URLs from your scan results, run:
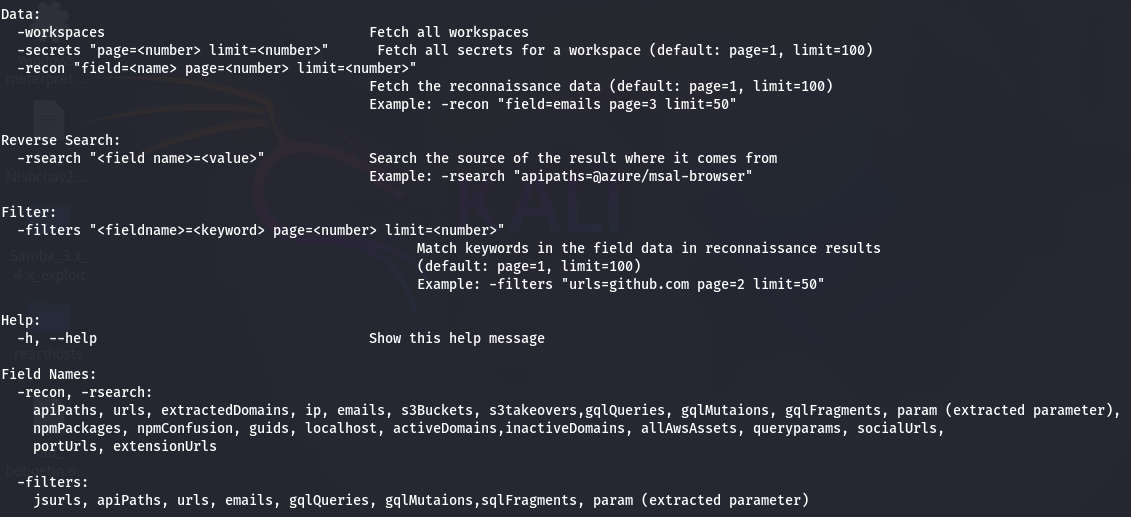
jsmon-cli -wksp <ID> -key <KEY> -silent -recon "field=localhost page=1"
The output might reveal entries like http://localhost:3000/api/auth or http://127.0.0.1:8080/admin/debug. These findings tell you that the backend likely runs on port 3000, uses a REST API structure, and has authentication endpoints, all valuable intelligence for further testing.

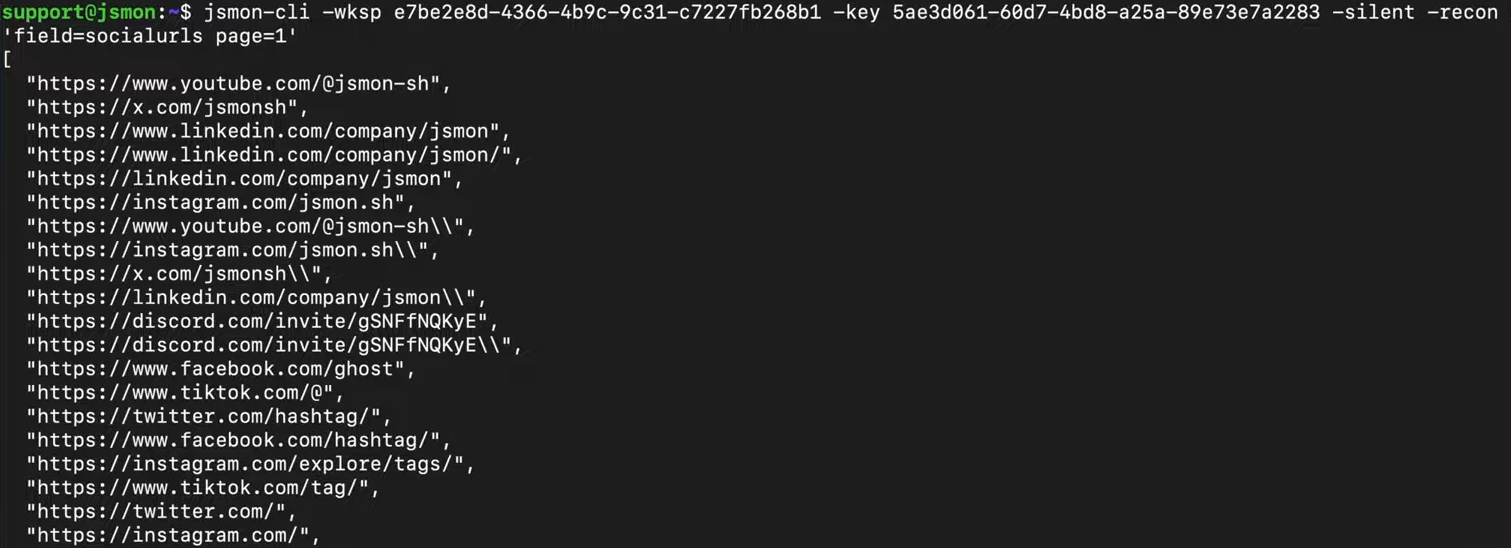
Mapping Social Media Footprints
Understanding a target's external presence can provide valuable context and sometimes even additional attack surfaces. JavaScript files often contain links to social media profiles, support channels, and third-party integrations.
To extract all social media URLs, use:
jsmon-cli -wksp <ID> -key <KEY> -silent -recon "field=socialurls page=1"
This might reveal LinkedIn company pages, Twitter handles, Facebook pages, GitHub repositories, and more. While not directly exploitable, this information helps you build a complete picture of the organization's digital footprint.
Discovering Sensitive Assets
Jsmon's modular approach allows you to query for specific types of data by simply changing the field parameter. Here are some of the most useful queries:
Extracting Email Addresses:
jsmon-cli -wksp <ID> -key <KEY> -silent -recon "field=emails"
Email addresses found in JavaScript can reveal developer contacts, support channels, and sometimes even credentials in comments.

Finding S3 Buckets:
jsmon-cli -wksp <ID> -key <KEY> -silent -recon "field=s3Buckets"
S3 bucket URLs are frequently hardcoded in frontend code. Once discovered, these can be tested for misconfigurations, public read access, or sensitive data exposure.
Other Valuable Fields:
You can also query for API endpoints (field=apipaths), internal URLs (field=internalurls), and other interesting data points. Each query runs against your already-collected data, returning results instantly.
Advanced Features: Filters & Reverse Search
As your reconnaissance data grows, you'll need more sophisticated ways to sift through findings and identify the most critical information. Jsmon CLI provides powerful filtering and reverse search capabilities for exactly this purpose.
Filtering Results
Sometimes a query returns hundreds or even thousands of results. You don't want to manually review every URL, you want to focus on the interesting ones. Jsmon's filtering system allows you to narrow down results using keywords.
For example, to find only URLs containing the word "admin":
jsmon-cli -filters "urls=admin" -wksp <ID> -key <KEY>
This will return only URLs that match your filter criteria. You can also combine multiple filters to create more specific queries. This is particularly useful when looking for sensitive endpoints like admin panels, debug interfaces, or API documentation pages.
Reverse Search: Understanding Context
Here's a scenario that happens all the time in bug bounty: you discover an interesting API endpoint, perhaps /api/v1/user/delete, but you don't know which JavaScript file it came from. Understanding the context, which file, which feature, which part of the application, can be crucial for exploitation.
This is where reverse search comes in. It allows you to work backwards from a finding to its source:
jsmon-cli -rsearch "apipaths=/api/v1/user" -wksp <ID> -key <KEY>
The output will show you exactly which JavaScript file(s) contain that specific endpoint. This context can reveal:
- Whether the endpoint is used in authenticated or unauthenticated contexts
- What other related endpoints exist in the same file
- How the endpoint is called and what parameters it expects
- Whether there are comments or debug code nearby
Reverse search transforms individual findings from isolated data points into actionable intelligence with full context.
Workflow: Tool Integration
Jsmon CLI isn't meant to be used in isolation, it's designed to slot perfectly into your existing reconnaissance workflow. By chaining together multiple tools, you can create a fully automated pipeline that goes from domain enumeration to JavaScript analysis without any manual intervention.
Here's a typical workflow that many bug bounty hunters and security professionals use:
Step 1: Subdomain Enumeration
First, discover all subdomains associated with your target using a tool like subfinder:
subfinder -d target.com -silent > subdomains.txt
This creates a list of all discovered subdomains.
Step 2: Filtering for Live Hosts
Not all discovered subdomains will be live or accessible. Use httpx to probe each subdomain and filter for responsive web servers:
cat subdomains.txt | httpx -silent > live_urls.txt
Now you have a refined list containing only live, accessible URLs.
Step 3: JavaScript Reconnaissance
Feed this list directly into Jsmon CLI for comprehensive JavaScript analysis:
jsmon-cli -f live_urls.txt -key <KEY> -wksp <ID>
Step 4: Query and Analyze
Once scanning is complete, query for specific intelligence:
jsmon-cli -wksp <ID> -key <KEY> -silent -recon "field=apipaths" > api_endpoints.txt
jsmon-cli -wksp <ID> -key <KEY> -silent -recon "field=s3Buckets" > s3_buckets.txt
The One-Liner Approach
For maximum efficiency, you can chain these commands together:
subfinder -d target.com -silent | httpx -silent | tee urls.txt | xargs -I {} jsmon-cli -d {} -key <KEY> -wksp <ID>
This single command will enumerate subdomains, filter for live hosts, and immediately begin JavaScript analysis, all without any manual intervention.
Continuous Monitoring
One of the most powerful use cases for Jsmon CLI is continuous monitoring. You can set up a cron job that runs your reconnaissance pipeline daily, weekly, or on any schedule you choose. This allows you to automatically detect new subdomains, new JavaScript files, or newly exposed endpoints without manual rescanning.
A simple cron entry might look like:
0 2 * * * /path/to/your/recon-script.sh
This would run your complete reconnaissance pipeline every day at 2 AM, ensuring you never miss new attack surface as it appears.
Conclusion
Jsmon CLI fundamentally shifts JavaScript reconnaissance by separating scanning from analysis. It replaces manual effort with a scalable, automated pipeline that allows researchers to work faster and more efficiently.
The key advantages are clear:
- Scalability & Speed: Scan thousands of targets and query pre-analyzed data instantly without rescanning.
- Integration: Fits seamlessly with tools like
subfinderandhttpx. - Organization: Workspace-based architecture keeps findings structured.
- Flexibility: Extract exactly the intelligence you need with modular queries.
The days of manually clicking through JS files are over. By automating the repetitive aspects of reconnaissance with Jsmon CLI, you free up your time for what actually matters: creative exploitation and finding critical vulnerabilities.